在 ABP 2.3 和 Vue 单页应用中的踩坑总结
前言 离 http://acm.nwpu.edu.cn 开发结束已经过去半年多了,我最近也放弃了考研的打算,现在也算是有空写博客了_(:3」∠)_。我就在这一篇博文中总结一下之前踩过的坑。注意,这篇博文中的后端技术仅限于 Asp.Net Core 1.1 及 AspNetBoilerplate 2.3.0。我不保证这里的解决方案在现在的 .net core 2.0 和 ABP 3.X.X 里还能一样工作。另外,直接写在ABP、VUE文档里或者用Google能直接查到的解决方案我也是懒得在这里再写一遍的。
这个网站是一个前后端完全分离的应用,后端用 ABP 来提供 api 供前端调用;前端是用 vue 编写的单页应用,在构建过程中会直接生成出目标 html 和 js,放进 .net core 的 wwwroot 中。在部署环境中由后端来提供前端的静态文件。
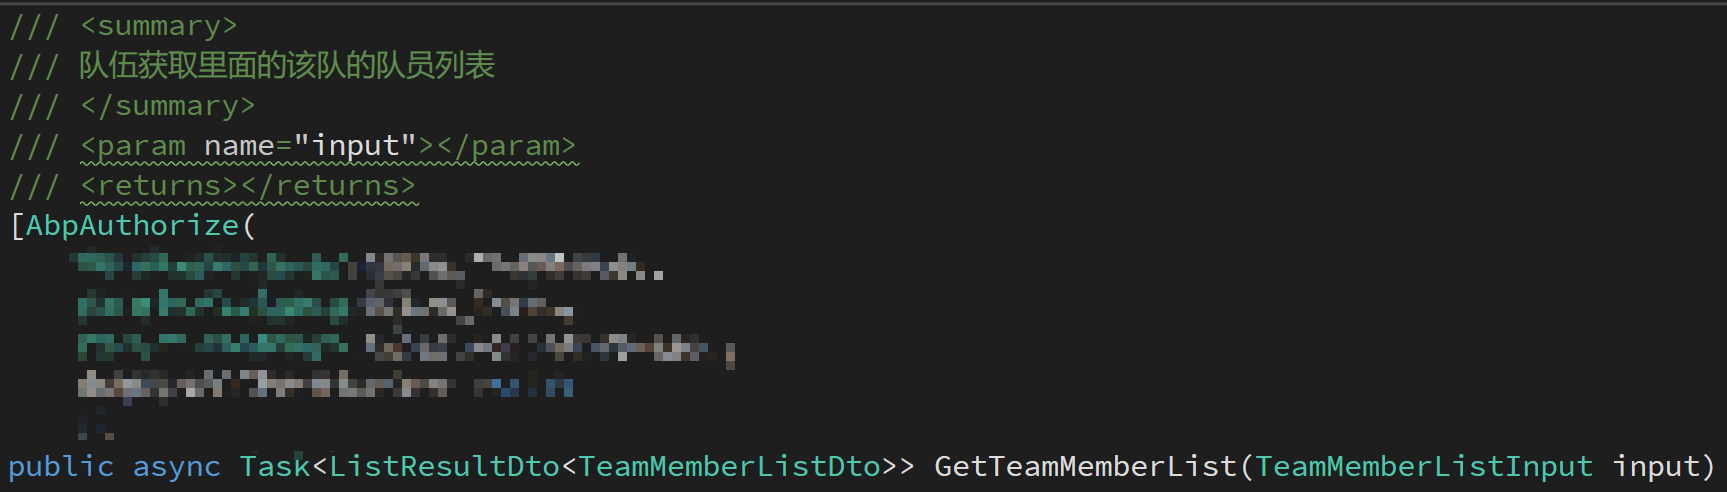
后端ABP及ASP.NET CORE相关 把 Service 的注释文档放进 Swagger UI 中 默认情况下 Abp 生成的 swagger 里面只有Service 的方法名,没有文档。我们可以把Service 方法里 summary tag的里面的注释输出成 swagger 的文档。效果是这样的:
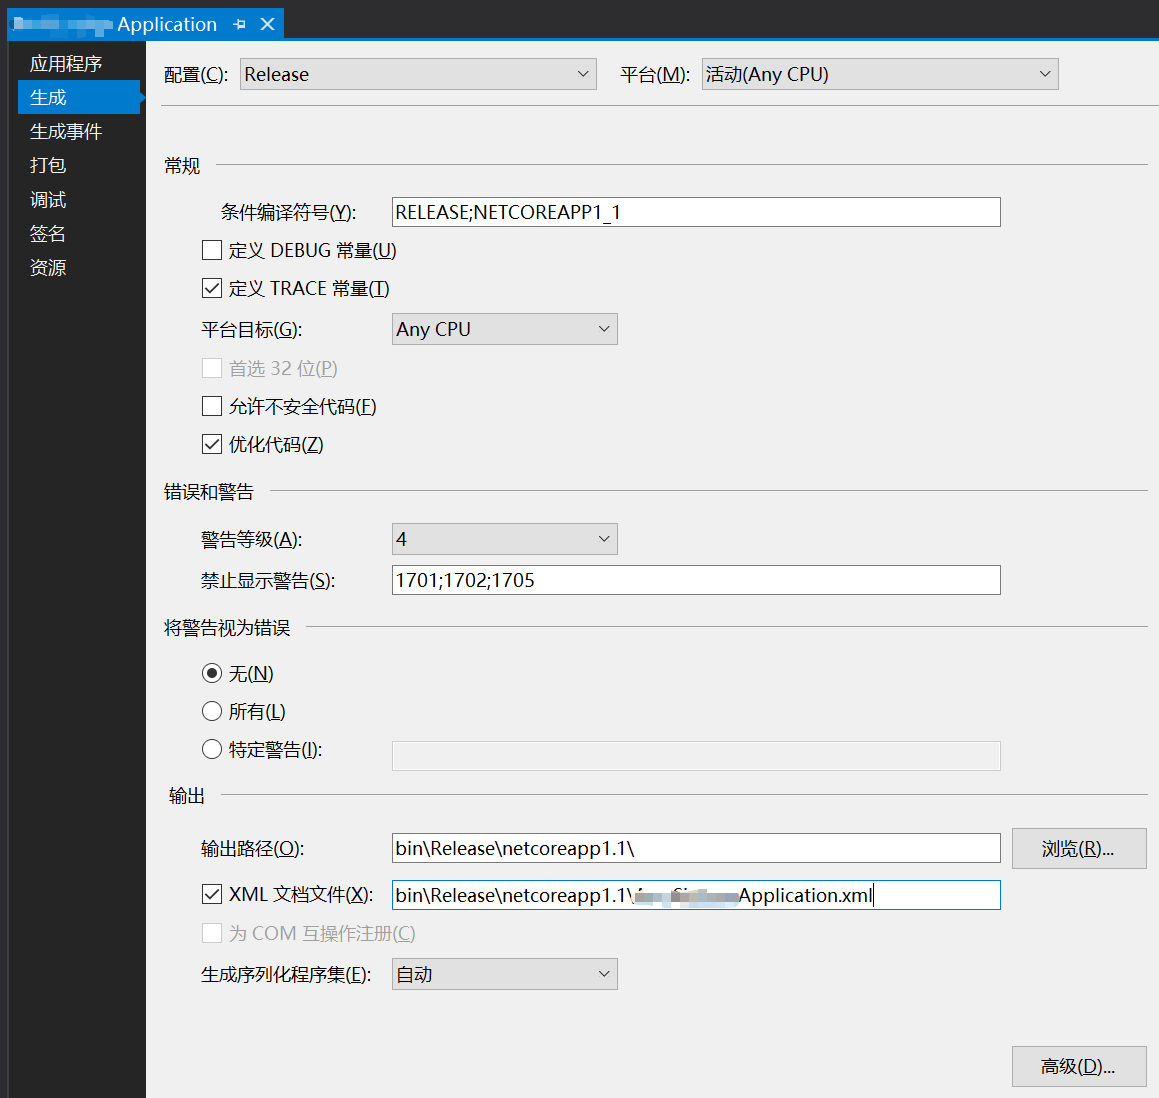
第一步:输出文档 直接修改业务层 XXX.Application 的属性,生成 XML 文档:
第二步:展示文档 修改 XXX.Web.Host/Startup/Startup.cs 文件,加上两行代码:
1
2
using System.IO;using Microsoft.Extensions.PlatformAbstractions;
找到同一个文件的 services.AddSwaggerGen 那一行,在配置函数里加上
1 2 3 4 5 6 #if (!DEBUG) var basePath = PlatformServices.Default.Application.ApplicationBasePath;var docPath = Path.Combine(basePath, "XXX.Application.xml" );options.IncludeXmlComments(docPath); #endif
这里的 docPath 是生成的文档文件的目录。我的设定是在 production 模式下生成文档,所以这里直接定位了build出来的文档的位置。
将 authorization token 放进 cookie 中 一开始我们的后端API是遵照 rest 标准的。只把租户ID和Authorization Token放进http请求的header里面。后来发现这样做还不行。因为这个网站会对读取文件有权限控制,而浏览器在下载诸如图片之类的文件的时候(用img标签里的请求)不会自动在header里面加上。所以必须把这个放进cookie里面。不过我没有在ABP的文档里找到“从Cookie里面读取Authorization Token”之类的东西。所以我写了一个中间件从 Cookie 里面读取 Authorization 字段,放进 header 里面。
另外,对于租户ID而言,ABP会直接读取 Cookie 或者 header 中的 Abp.TenantId 作为租户id,所以这个是不需要用中间件处理的。
中间件代码:
1
2
3
4
5
6
7
8
9
10
11
12
13
14
15
16
17
18
19
20
21
22
23
24
25
26
27
28
29
30
31
32
33
using System;using System.Threading.Tasks;using Microsoft.AspNetCore.Http;namespace AcmSignup.Identity { public class CookieAuthMiddleware { public const string CookieAuthKey = "OAuthToken" ; public const string AuthorizationStart = "Bearer " ; private readonly RequestDelegate _next; public CookieAuthMiddleware (RequestDelegate next ) { if (next == null ) { throw new ArgumentNullException(nameof (next)); } _next = next; } public async Task Invoke (HttpContext context ) { string token; if (context.Request.Cookies.TryGetValue(CookieAuthKey, out token) && !context.Request.Headers.ContainsKey("Authorization" )) { context.Request.Headers.Add("Authorization" , AuthorizationStart + token); } await _next(context); } } }
添加中间件:Startup.cs 的 Configure 方法中加上一句 app.UseMiddleware<CookieAuthMiddleware>(); 。
注意,这一条必须写在 app.UseAbp() 前面。
在 .Net Core 的 XUnit 测试框架中跳过部分测试 我们使用了持续集成工具来运行单元测试。在我们的代码中,有一部分测试用例运行耗时比较长,并且不常改变。我们不需要在每次跑测试的时候都运行这些测试用例,又不想把这些用例删掉或注释掉,就可以用下面的方法来解决:
首先增加给测试用例增加Category:
1 2 3 4 5 [Fact ] [Trait("Category" , "NetworkBased" ) ] [Trait("Category" , "Slow" ) ] public async Task GetIcpcInformationStreamAsync_应该能获取到字符流()...
然后在 travis-ci 的配置文件中把运行测试的命令从 dotnet test 改成 dotnet test --filter Category!=Slow。
这样,在 travis-ci 测试的时候不会运行在 Slow Category 中的测试用例。而我们自己执行的时候仍然可以直接用 dotnet test 来执行所有测试用例。
将用户与租户解绑 我们的项目中有一个需求,就是可以将同一个用户用在多个租户中。即网站中存在多个数据独立的租户,但用户必须独立于租户存在。也就是说,同一个用户可以在租户之间切换,框架在筛选数据时只根据header或者Cookie中的租户id来判断租户。而ABP默认的机制中,用户是处于租户内的,ABP会直接通过Authorization Token找出用户,然后根据用户的数据选出租户,这不是我们需要的。
在这方面,我做了比较多的修改,我刚刚查了一下git的提交记录,感觉要全整理出来还要花一些时间,所以这里就拖到以后再补充吧,先放上一些比较好总结的部分。
AbpSession 原先的行为并不是这样(我也忘了原先的行为是啥了,大家感兴趣的话可以自己去查ABP的源码)。我们可以继承一下原来的AbpSession,修改一下获取租户ID的行为,然后用依赖注入把新的ABPSession弄进去。
AcmSignupSession.cs
1
2
3
4
5
6
7
8
9
10
11
12
13
14
15
16
17
18
19
20
21
22
23
24
25
26
27
28
29
30
31
using Abp.Configuration.Startup;using Abp.MultiTenancy;using Abp.Runtime;using Abp.Runtime.Session;using Castle.Core.Logging;using System;namespace AcmSignup.Authorization { public class AcmSignupSession : ClaimsAbpSession { public AcmSignupSession (IPrincipalAccessor principalAccessor, IMultiTenancyConfig multiTenancy, ITenantResolver tenantResolver, IAmbientScopeProvider<SessionOverride> sessionOverrideScopeProvider ) : base (principalAccessor, multiTenancy, tenantResolver, sessionOverrideScopeProvider ) { } public override int ? TenantId { get { if (OverridedValue != null ) { return OverridedValue.TenantId; } else { return TenantResolver.ResolveTenantId(); } } } } }
在 XXXCoreModule.cs 的 PreInitialize 里面加上这一段
1 2 IocManager.Register<IAbpSession, AcmSignupSession>(DependencyLifeStyle.Singleton);
覆写 Net Core 中的 UserManager 相关的代码,以取消租户绑定 UserManager 是 .net core 里面的,原有的 UserManager 只会在当前租户中获取数据,需要在外面包裹一层 UnitOfWork 的 using 来将租户 id 设为空。
跟 Session 一样,必须继承一下这个类,覆盖一些方法,然后用依赖注入把这个搞进去。不过在ABP默认的模板中,已经有项目自己的 UserManager 了,可以直接改。
例如:
1 2 3 4 5 6 7 8 [UnitOfWork ] public override async Task<User> FindByEmailAsync (string email{ using (_unitOfWorkManager.Current.SetTenantId(null )) { return await base .FindByEmailAsync(email); } }
这一类的都要改成这样。并且类似于 GetGrantedPermissionsAsync 之类的方法还要标记为 Obsolete 的。
我写了一个 ahk 脚本 来生成所有可以重载的方法,适用于装了 Resharper 的 visual studio。只要启动脚本,定位到派生类的body里,然后狂按 f1 就可以了。
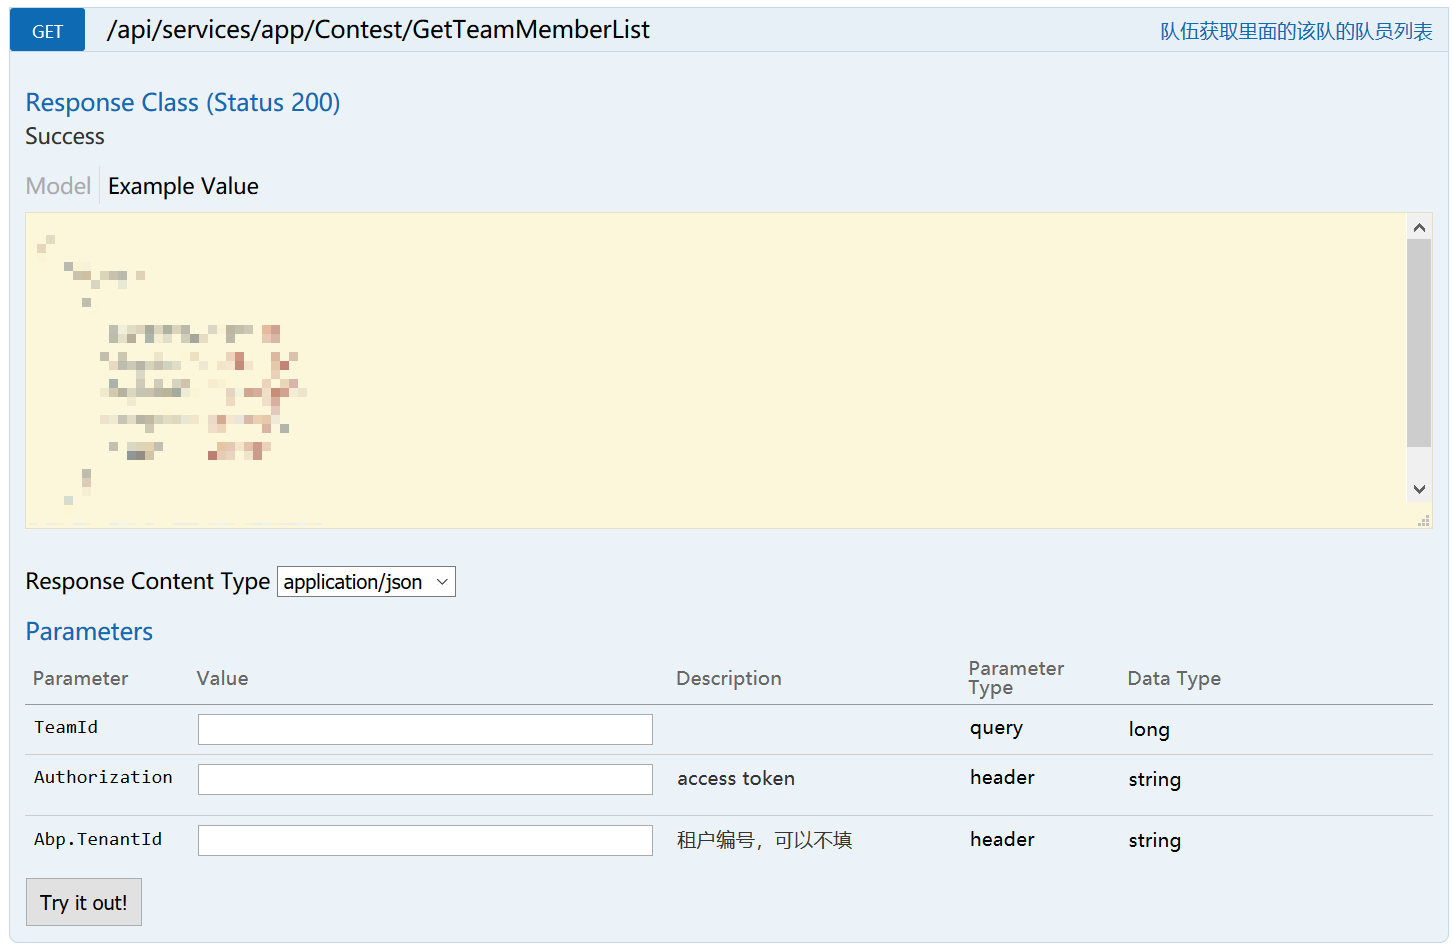
魔改 swagger,添加字段 我们需要直接在 swagger 里面添加 Authorization 和租户ID,填入的内容会被自动放进 header 里面,这样就能把 swagger 当临时的后台用了,效果是这样的:
这种效果可以通过添加 IOperationFilter 来解决。首先在 XXX.Web.Core 里面加上一个 AuthorizationHeaderParameterOperationFilter.cs:
1
2
3
4
5
6
7
8
9
10
11
12
13
14
15
16
17
18
19
20
21
22
23
24
25
26
27
28
29
30
31
32
33
using Microsoft.AspNetCore.Mvc.Authorization;using Swashbuckle.AspNetCore.Swagger;using Swashbuckle.AspNetCore.SwaggerGen;using System.Collections.Generic;using System.Linq;namespace AcmSignup.Configuration { public class AuthorizationHeaderParameterOperationFilter : IOperationFilter { public void Apply (Operation operation, OperationFilterContext context ) { if (operation.Parameters == null ) operation.Parameters = new List<IParameter>(); operation.Parameters.Add(new NonBodyParameter { Name = "Authorization" , In = "header" , Description = "access token" , Required = false , Type = "string" }); operation.Parameters.Add(new NonBodyParameter { Name = "Abp.TenantId" , In = "header" , Description = "租户编号,可以不填" , Required = false , Type = "string" }); } } }
然后在 Startup.cs 里面找到 services.AddSwaggerGen,加上一行 options.OperationFilter<AuthorizationHeaderParameterOperationFilter>();。现在是这样的:
1 2 3 4 5 6 7 services.AddSwaggerGen(options => { options.SwaggerDoc("v1" , new Info { Title = "AcmSignup API" , Version = "v1" }); options.DocInclusionPredicate((docName, description) => true ); options.OperationFilter<AuthorizationHeaderParameterOperationFilter>(); });
前端 这一部分主要是讨论如何将 ABP 同 Vue 结合在一起。
(我刚刚发现官网上已经提供了 ABP+VUE 的模板,看来我已经不需要写这一部分了)
持续集成 用 travis-ci 同时测试 javascript 和 c# 本项目的前后端是放在同一个 git repo 中的,要测试的话需要使用 matrix 来分离前后端的项目。
.travis.yml
1
2
3
4
5
6
7
8
9
10
11
12
13
14
15
16
17
18
19
20
21
22
23
24
25
26
27
28
29
30
31
32
33
34
matrix: include: - language: node_js node_js: - "node" cache: directories: - frontend/node_modules install: - cd frontend - rm .npmrc - npm install script: - npm run lint - npm run build - language: csharp solution: ./backend/AcmSignup.sln mono: none dotnet: 1.1 .0 dist: trusty install: - cd backend/test/AcmSignup.Tests - dotnet restore script: - dotnet test --filter Category!=Slow
自动部署前后端 我还写了一个脚本,可以在 GitHub 上新建一个 release 的时候自动编译前后端并将结果放进 release 中。这样在服务器上部署的时候直接解压压缩包然后重启服务就好了。
这里的代码需要改一下才能在别的项目上运行。
.travis.yml
1
2
3
4
5
6
7
8
9
10
11
12
13
14
15
16
17
18
19
20
21
22
23
24
25
26
27
28
29
30
31
32
33
34
35
36
37
38
39
40
41
42
43
44
45
46
47
48
49
50
51
52
53
54
55
56
57
58
59
60
61
62
63
64
65
66
67
68
69
70
71
72
73
74
75
76
77
78
sudo: false stages: - name: test - name: deploy if: tag =~ ^v matrix: include: - stage: test language: node_js node_js: - "node" cache: directories: - frontend/node_modules install: - cd frontend - rm .npmrc - npm install script: - npm run lint - npm run build - language: csharp solution: ./backend/AcmSignup.sln mono: none dotnet: 1.1 .0 dist: trusty install: - cd backend/test/AcmSignup.Tests - dotnet restore script: - dotnet test --filter Category!=Slow - stage: deploy sudo: true language: csharp mono: none dotnet: 1.1 .0 dist: trusty before_install: - sudo apt-get install -y nodejs cache: directories: - frontend/node_modules install: - rm frontend/.npmrc script: - cd tools - sh deploy-all.sh - cd .. before_deploy: - zip -r dist.zip dist/* - zip -r wwwroot.zip dist/acmsignup/wwwroot/* deploy: provider: releases api_key: "你的 TOKEN" file: - dist.zip - wwwroot.zip skip_cleanup: true on: tags: true
tools/deploy-all.sh
1
2
3
mkdir ../dist sh ./build-frontend.sh sh ./build-backend.sh
tools/build-frontend.sh
1
2
3
4
5
6
7
rm -rf ../dist/acmsignup/wwwroot/index.html ../dist/acmsignup/wwwroot/favicon.ico ../dist/acmsignup/wwwroot/static cd ../frontendnpm install npm run build cd distmkdir -p ../../dist/acmsignup/wwwroot find . ! -type d | grep -v '.*.map$' | xargs tar -cf - | tar -C ../../dist/acmsignup/wwwroot -xvf -
tools/build-backend.sh
1
2
3
4
find ../dist/acmsignup/ | egrep -v '^../dist/acmsignup/$|^../dist/acmsignup/wwwroot' | xargs rm -rf dotnet restore ../backend/src/AcmSignup.Web.Host/ dotnet publish -f netcoreapp1.1 -c Release ../backend/src/AcmSignup.Web.Host/ cp -r ../backend/src/AcmSignup.Web.Host/bin/Release/netcoreapp1.1/publish/* ../dist/acmsignup